Commission Services
Own a Piece of Timeless Art
I bring the judgment of a painter and sculptor to every stage of a project—from the first likeness study to the final surface. My studio combines traditional artistic practice with high-resolution scanning, digital sculpting, and precision printing to create work with convincing form, character, and material presence.
Bronze Sculpture Commissions
Minerva
Minerva is an example of a bronze sculpture commission: a dancer’s movement developed through photographs, drawings, and clay, then cast in bronze in Italy and installed on a stainless steel base.
01 Photograph

Blair photographed in the studio for Minerva.
Photograph Blair’s movement to establish gesture, balance, and drapery.
02 Drawings

Figure study drawn from the dancer’s pose.
Develop drawings of the figure, owl, and stainless steel base.
03 Sculpt the Clay

Clay anatomy study and the draped figure in progress.
Establish anatomy and gesture in clay, then develop the drapery and flowing hair around the pose.
04 Mold & wax

The wax figure at Salvadori Arte in Italy.
Take molds and prepare wax versions for investment casting.
05 Stainless Steel Base

The stainless steel base in the workshop.
Make and assemble the sweeping support in stainless steel.
06 Cast & Finish

The bronze figure after casting and surface finishing.
Cast the figure in bronze at Salvadori Arte, Italy, and finish its surface.
07 Combine Elements

The finished figure and water detail in the foundry.
Bring the figure, owl, water detail, and steel base together.
08 Install Sculpture

Minerva installed outdoors.
Install outdoors, where the work meets light and landscape.
One detail. Three
stages.Minerva’s foot and the surrounding splash show how a single sculpted detail is carried through the casting process.

01 / Sculpted model

02 / Wax pattern

03 / Cast metal
Stainless Steel Sculpture Commissions
Splash
Splash is an example of a stainless steel sculpture commission: moving water developed through drawings, high-speed photographs, resin and full-size forms, welded steel, and a mirror finish to become a working fountain.
01 Draw

The concept drawing for Splash.
Draw the composition for a permanent splash that will also function as a fountain.
02 Photograph

High-speed reference photograph of the splash.
Seed Creative records splashes with several high-speed cameras from multiple angles.
03 Sculpt

The resin model in the studio.
Sculpt the resin model, then develop the full-size form using a welded frame, fiberglass resin, and plaster.
04 Assemble

Welded stainless steel before mirror polishing.
Weld the stainless steel sections together. The seams and unfinished surface remain visible at this stage.
05 Polish Mirror Finish

The completed mirror finish.
Work and polish the steel surface until it reflects light and the surrounding landscape.
06 Bring to Life

Splash with its fountain operating.
Install the sculpture and put the fountain into operation.
From resin to reflective steel.
The photographed progression: the resin model, the welded stainless steel before polishing, and the completed mirror finish.
01 / Resin model
02 / Welded stainless steel
03 / Mirror finish
From my photographs to painted portraits.
See the source image beside the painting, then explore the studio views and details on the website.
01.1 A portrait in red

PHOTOGRAPHED BY CALEB
Reference photograph

PHOTOGRAPHED BY CALEB
Painted Portrait
The red tie, chair, and surrounding room carry from the photograph into the painted composition.
01.1 A portrait of two

PHOTOGRAPHED BY CALEB
Reference photograph

PHOTOGRAPHED BY CALEB
Painted Portrait
A shared pose and familiar setting provide the starting point for a painted portrait of the couple.
MORE COMMISSIONED PORTRAITS
People, presence, and place

01.3 / Seated portrait
A portrait within a personal setting

01.4 / Formal portrait
A finished portrait and a closer look

01.5 / Children’s portrait
Two figures in a shared landscape
From surviving references and remembered details.
Painted recreations developed from black-and-white photographs and verbal descriptions, bringing historical subjects into color and a fully realized setting.
02.1 / Portrait among the foliage
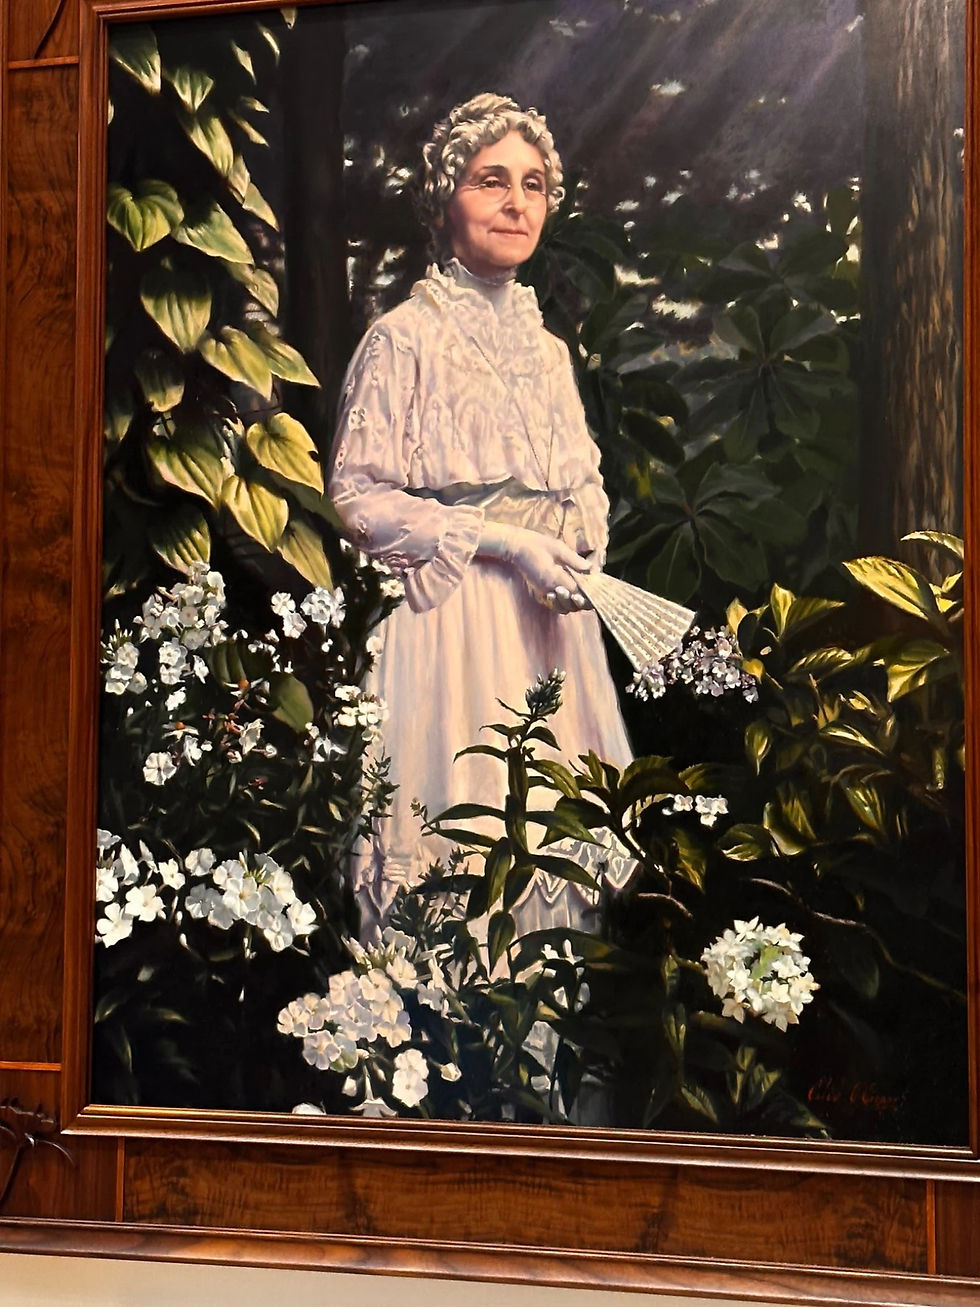
The finished historical portrait
02.2 / Portrait beside a window

The finished historical portrait
THE FRAMED WORKS IN THEIR SETTING

A portrait within a personal setting

View of the framed painting
RELATED SERVICE / PORTRAITS IN SCULPTURE

Portrait bust and column

Installed portrait sculpture
Before
01 Reference photographs

Likeness and facial structure

Hat, glasses, and character

Color reference: clothing, presence, and expression
Digital Sculpting
02 Likeness & an original
poseI study the photographs together to establish Gaston’s likeness, then compose a new sculptural pose: the head angle, expression, hat, and relationship of the head to the shoulders.
Surface Refinement
03 Skin & Cloth
I refine the digital sculpture with skin displacement maps and cloth textures, adding fine surface relief to the modeled face and clothing.
Displacement maps translate light and dark values into fine surface relief.

After
04 The Bronze Result

The completed portrait bust
Bronze-photo background edited for presentation.
Portrait painting
An original portrait brings likeness, expression, and a personal setting together in one painted composition.

A portrait with presence.
The judicial robe, court seal, flag, and expression give this portrait its setting and character.

Photograph to digital sculpture
A portrait photograph becomes a three-dimensional likeness. The face, head, cap, and uniform are developed together, then considered from more than one angle.

01 / REFERENCE
Start with the likeness
The portrait establishes the features, expression, and uniform.

02 / DIGITAL SCULPTING
Develop the portrait
The head, cap, and shoulders become a digital sculptural study.

03 / ANOTHER VIEW
Consider the depth
The profile reveals the form of the face, neck, and cap.
Skin, eyes & surface detail
Once the likeness is established, I refine the surface with eye detail and skin textures. Displacement maps and sculpting alphas let me impress fine relief into the digital form.

01 / SCULPTED LIKENESS
The complete portrait
Eye and skin detail are considered in relation to the whole face.

02 / EYE TEXTURE
Impress fine iris detail into the digital eye.

03 / SKIN TEXTURE
Pores and fine relief.
The face close-up shows skin detail being worked into the digital surface.
A displacement map uses light and dark values to move the digital surface inward or outward.Digital sculpture to 3D print
The digital work becomes a physical object. These photographs show the modeled portraits and the printed forms they produced.
EXAMPLE A / LAUREL-CROWNED PORTRAIT

01 / Digital model and texturing
-

02 / Physical 3D print
The physical result.
The woman with the laurel crown is the 3D print of the digital portrait. Hair, features, crown, and surface detail become a tangible form.
EXAMPLE B / MILITARY PORTRAIT AND CAP

01 / Photograph

02 / Digital head

03 / Digital cap

04 / Physical print
Image restoration & colorization
Clarity, tonal balance, and natural-looking color for historical and family photographs. Compare the original images with their restored color versions.
EXAMPLE 01
Bring back a faded portrait.
The original oval portrait is shown alongside its clearer color version, with the dress, flowers, and setting visible.
BEFORE / ORIGINAL PHOTOGRAPH

AFTER / RESTORED + COLOR

EXAMPLE 02
Recover definition and tone.
Compare the face, hair, mustache, and clothing as the monochrome portrait becomes a color image.
BEFORE / ORIGINAL PHOTOGRAPH

AFTER / RESTORED + COLOR

EXAMPLE 03
Give a historical portrait new presence.
The original photograph andthe restored version show thechange in skin tones, bearddetail, and clothing.
BEFORE / ORIGINAL PHOTOGRAPH

AFTER / RESTORED + COLOR

Color is interpretive when reliable color references are unavailable.
3D scan to investment pattern
From an original clay sculpture to a hollow printed pattern for investment casting. An illustrated workflow using my full-body Deontay Wilder sculpture.
Color is interpretive when reliable color references are unavailable.

ORIGINAL PHOTO
01 / ORIGINAL CLAY
Begin with the sculpture.
The original full-body clay sculpture establishes the likeness, pose, folds, and surface detail.

PROCESS ILLUSTRATION
02 / 3D SCANNING
Capture the form.
Capture overlapping views around the sculpture,
including undercuts and hard-to-see surfaces. Check for missing coverage.
PROCESS ILLUSTRATION
03 / DIGITAL CLEANUP
Refine the scan.
Align and merge scans; remove studio supports, repair geometry, and check dimensions at the intended output scale.

PROCESS ILLUSTRATION
04 / HOLLOWING + SECTIONING
Design the pattern.
Create a hollow pattern with a 4 mm target wall. Check thickness, divide for the printer, and plan openings, joins, and supports.

PROCESS ILLUSTRATION
05 / SLICING + PRINTING
Print the sections.
Export and slice the checked model. Print in foundry-approved PLA or castable resin; prepare each material as specified.

PROCESS ILLUSTRATION
06 / ASSEMBLY + FINISHING
Prepare for investment.
Remove supports, finish layers and seams, join sections, and inspect. The foundry adds gates and vents before ceramic investment.
A hollow wall, built to print.

4 mm
4 mm is the requested plastic-pattern wall, not the final metal thickness. Confirm it with the foundry for the chosen material and geometry. Castable resins may require substantially thinner walls or a different internal structure.
OPTION A / PLA FILAMENT
The illustration shows FDM printing. Confirm the exact PLA grade and burnout approach with the foundry; finish the layer lines and seams.
OPTION B / CASTABLE RESIN
Use resin intended for investment casting. Drain, wash, and cure the hollow parts according to its instructions before assembly.
What changes — and what remains.
TRADITIONAL
Clay original
Rubber mold + wax replica
Gate & invest
TRADITIONAL
Clay → 3D scan
Digital prep + hollow printed pattern
Gate & invest
SHARED FOUNDRY PROCESS
Ceramic investment → burnout → metal pour → finishing
The rubber reproduction mold and wax replica can be bypassed. Ceramic investment remains. Wax sprues or repairs may still be used; the foundry determines gating, interior treatment, and burnout.
Chief Tuscaloosa: SLA printing
Chief Tuscaloosa: the gray sculpture captured digitally, printed in sections on a Formlabs Form 4L, then cleaned and assembled as a castable-resin pattern.
ITEM 6 / ADDITIONAL PROCESS MONTAGE / ILLUSTRATED WORKFLOW

01 / SCAN THE GRAY ORIGINAL
Capture overlapping views of the sculpture. Check the face, hands, moccasins, pipe, and feather detail for complete coverage.

02 / PREPARE PRINTABLE SECTIONS
Repair the mesh, divide the sculpture for the build volume, and plan joins, hollow or latticed geometry, drains, and supports

03 / PRINT ON THE FORM 4L
Orient and support the sections in PreForm. Print with compatible Clear Cast Resin; repeat the process for the remaining parts.

04 / REMOVE WITH SCAFFOLDING
Remove the build platform with the printed sections and external supports still attached. Transfer the supported parts for post-processing.

05 / WASH, CURE & CLEAN
Wash and drain the interiors, dry, post-cure as specified, and remove supports in the recommended sequence. Finish the contact marks.

06 / REASSEMBLE THE SCULPTURE
Test-fit and bond the sections with a casting-compatible method. Finish seams and inspect the pattern before foundry gating and investment.

From printed sections to the full sculpture.
The external support scaffolding is removed; the cleaned sections are joined to recover the scanned composition. Clear Cast requires resin-specific hollowing or latticing, drainage, and curing. These are process illustrations, not a validated print file or a record of an actual print run.
The assembled pattern goes on to foundry gating, ceramic investment, burnout, and metal casting.
Cold-cast resin reproductions
Cold-cast resin reproductions of all my statue work are available for sale at 18 inches and larger. Athena and Coach Bryant Victorious are shown here as 18-inch examples. Contact me to discuss your preferred sculpture and size.
EXAMPLE 01
Athena
18 inches · Cold-cast resin · Bronze finish
Three views of one reproduction. The changing angle reveals the figure, flowing drapery, globe, and surrounding details.

View 1 / Athena

View 2 / Athena

View 3 / Athena
EXAMPLE 02
Coach Bryant Victorious
18 inches · Cold-cast resin · Bronze finish
Coach Bryant leans against the goalpost, one hand at his hip. This 18-inch reproduction carries the stance, clothing, and sculpted character of the larger work into a smaller format.
Own a reproduction of my work.
All my statue work is available as cold-cast resin reproductions at 18 inches and larger. Choose the statue and size you would like to bring into your home or collection.

Prototype scanning & resin printing
Capture a physical prototype, develop its digital form, and reproduce it in an engineering resin selected for the job. A mechanical mounting housing illustrates the service.

SERVICE MOCKUP / CALEB SCANNING A PHYSICAL PROTOTYPE
01
Capture the prototype
Scan the accessible surfaces and check coverage around openings, ribs, and mounting points.
02
Prepare the digital part
Clean the mesh and rebuild or check critical interfaces. Establish the dimensions that must be verified.
03
Print in engineering
resinSelect a compatible resin for the required properties, then orient, support, slice, and print the part.
04
Finish and check
Wash, dry, and post-cure according to the resin instructions. Remove supports, finish contact marks, and check dimensions and fit.

Supported engineering-resin print / illustration

Prototype and finished resin reproduction / illustration
Choose the resin for the application.
Engineering resin options can prioritize toughness, stiffness, heat resistance, or flexibility. Select the material and post-cure for the intended use, then check critical dimensions, fit, and performance on the actual part.
Get a Quote
Pricing varies by size, material, and complexity. Custom quotes are available upon request.